How to Implement ChatGPT Service Level Authentication with Python and FastAPI
OpenAI offers several authentication strategies for ChatGPT plugin developers. When deploying a ChatGPT plugin, OpenAI recommends at a minimum implementing service level authentication. Service level authentication ensures requests to your plugin API come exclusively from plugin users. In this post, you’ll learn how to implement service level authentication with Python and FastAPI.
If you’ve never made a ChatGPT plugin before, I recommend reading one of our introductory tutorials first:
- How to make a ChatGPT plugin with Python
- How to make a ChatGPT plugin with Go
- How to make a ChatGPT plugin with Rust
- How to make a ChatGPT plugin with Ruby on Rails
- How to make a ChatGPT plugin with Elixir
What is Service Level Authentication?
Service level authentication is one of 4 authentication strategies OpenAI offers plugin developers. It’s a relatively simple strategy. First, you generate a secure client secret and provide that to ChatGPT. This client secret is meant to be shared only between your application and ChatGPT. On every request ChatGPT makes to your servers, it will send the provided client secret as a means to verify that the request originates from their servers.
Service level authentication provides a blanket authentication mechanism for all of your plugin users. You can use service level authentication to validate requests are coming from plugin users, without requiring users to initiate an authentication flow or provide their own unique keys. Its minimally intrusive, while still providing some level of protection for your plugin APIs.
One drawback of service level authentication is it does not authenticate individual users. Any ChatGPT plugin user who installs your app can hit your plugin API from the ChatGPT UI.
If you don’t have a need for authenticating at a user level, we recommend deploying your plugins with at least service level authentication. Fortunately, setting up service level authentication is straightforward, and only takes a few minutes.
Step 1: Set up the Plugin Project
First, you’ll need to set up a plugin project. For this example, we’ll use the same plugin implemented in this post. This tutorial assumes you have Python and Poetry installed. Start by creating a new poetry project:
poetry new chatgpt-service-auth-pluginThis will give you the following project scaffold:
chatgpt-service-auth-plugin
├── pyproject.toml
├── README.md
├── chatgpt_service_auth_plugin
│   └── __init__.py
└── tests
    └── __init__.py
Next, install FastAPI and uvicorn using Poetry:
poetry add fastapi uvicorn[standard]Note: If you are on a Mac you’ll need to wrap uvicorn[standard] in quotations: "uvicorn[standard]"
Finally, activate the virtual environment by running:
poetry shellNext, create a file main.py in the folder chatgpt_service_auth_plugin and copy the following contents:
from fastapi import FastAPI
from fastapi.middleware.cors import CORSMiddleware

app = FastAPI(
  title="Python ChatGPT plugin",
  description="A Python ChatGPT plugin"
)

# Enable CORS for https://chat.openai.com/
app.add_middleware(
    CORSMiddleware,
    allow_origins=["https://chat.openai.com"],
    allow_credentials=True,
    allow_methods=["*"],
    allow_headers=["*"],
)

@app.get("/hello", description="Says hello from the ChatGPT plugin")
async def hello():
  return {"message": "Hello from the plugin!"}
This implements a minimal ChatGPT plugin with CORS setup for local development. You can verify your API works by running:
uvicorn chatgpt_service_auth_plugin.main:appcAnd navigating to http://localhost:8000/hello. You will see the following:

Step 2: Create the Plugin Manifest
Next, you want to create a plugin manifest. The plugin manifest contains basic information about your plugin, including what kind of authentication mechanism your plugin is configured to use. Start by creating a new file in your plugin directory called ai-plugin.json and add the following contents:
{
  "schema_version": "v1",
  "name_for_human": "Service Auth Plugin",
  "name_for_model": "pythonPlugin",
  "description_for_human": "ChatGPT Plugin with Service Auth",
  "description_for_model": "plugin which says hello with service auth.",
  "auth": {
    "type": "service_http",
    "authorization_type": "bearer"
  },
  "api": {
    "type": "openapi",
    "url": "http://localhost:8000/openapi.json",
    "is_user_authenticated": false
  },
  "logo_url": "http://localhost:8000/logo.png",
  "contact_email": "support@example.com",
  "legal_info_url": "http://www.example.com/legal"
}
Next, add a route for accessing the plugin manifest from your app:
from fastapi import FastAPI
from fastapi.middleware.cors import CORSMiddleware
import json

app = FastAPI(
  title="Python ChatGPT plugin",
  description="A Python ChatGPT plugin"
)

# Enable CORS for https://chat.openai.com/
app.add_middleware(
    CORSMiddleware,
    allow_origins=["https://chat.openai.com"],
    allow_credentials=True,
    allow_methods=["*"],
    allow_headers=["*"],
)

# Load and serve the plugin manifest
with open('ai-plugin.json', 'r') as manifest_file:
    manifest_content = json.load(manifest_file)

@app.get("/.well-known/ai-plugin.json")
async def serve_manifest():
    return manifest_content

@app.get("/hello", description="Says hello from the ChatGPT plugin")
async def hello():
  return {"message": "Hello from the plugin!"}
For now, that’s all you need.
Step 3: Generate a Secret Key
To implement service level authentication, you need to share a secret key between your application and ChatGPT. You need to generate this secret key. To do so, create a new folder in your plugin directory called scripts. In the scripts folder, create a new file generate_secret_key.py and add the following contents:
import argparse
import secrets
import sys


def generate_key(length):
    return secrets.token_hex(length)


def parse_args(args):
    parser = argparse.ArgumentParser(description="Generate a secure key")
    parser.add_argument('length', type=int, help='Length of the key to be generated')
    parsed_args = parser.parse_args(args)
    return parsed_args


def main(args):
    parsed_args = parse_args(args)
    key_length = parsed_args.length
    key = generate_key(key_length)
    print(key)


if __name__ == "__main__":
  main(sys.argv[1:])
You can use this script to generate a secure key of arbitrary length. Now, run the script:
python scripts/generate_secure_key.py 32And you will see an output like:
1eabc3f0cfbf5ee59d831b35720eb0b932bd43889b5b35860794d25abfcc3990IMPORTANT: This key is meant to be secret. You should not share this key with anyone, or commit this key into your codebase. It’s best practice to use a secret manager that loads secrets into your deployment environment.
Now, rather than keeping this key as plaintext in your application, you’ll load it from your environment. First, add the key to your environment by running the following from the command line:
export CHATGPT_PLUGIN_SECRET=1eabc3f0cfbf5ee59d831b35720eb0b932bd43889b5b35860794d25abfcc3990Step 4: Verify Requests contain the Secret
Now, you need to configure your API to only process requests which contain the proper secret key. With service level authentication, ChatGPT will send your secret in the Authorization header of every request. Your API should check that the key in this header matches what you expect. If it does, you can process the request. If it does not, you should return a forbidden status.
First, you’ll need to load your secret from the environment. At the top of main.py, add the following:
import os

CLIENT_SECRET = os.environ.get("CHATGPT_PLUGIN_SECRET")
This will attempt to load your secret from an environment variable. If the environment variable is not present, it will raise an exception. Now, you need to implement the logic to check requests using FastAPI. To do this, you’ll need to add a few imports:
from fastapi import Depends, FastAPI, HTTPException
from fastapi.security import HTTPBearer
Next, add the following declaration before your app:
token_auth_scheme = HTTPBearer()Now, edit your hello request to look like this:
async def hello(token: str = Depends(token_auth_scheme)):
    if token.credentials == CLIENT_SECRET:
        return {"message": "Hello from the plugin!"}
    else:
        raise HTTPException(status_code=403, detail="Forbidden")
What you’ve just done is implemented logic to verify that:
- A request contains an Authorization header with a Bearer token
- That the Bearer token matches your client secret
You can validate this flow works by running this CURL command:
curl localhost:8000/helloIn the command line you will see:
{"detail":"Not authenticated"}That’s because you need to send a bearer token with the request. You can try sending a bad bearer token by running:
curl localhost:8000/hello -H "Authorization: Bearer notmytoken"And you will see:
{"detail":"Forbidden"}Finally, if you pass the correct token, you should see the correct message:
curl localhost:8000/hello -H "Authorization: Bearer YOUR_TOKEN_HERE"Result:
{"message":"Hello from the plugin!"}Step 5: Set up the Plugin
Now you need to go through the process of setting up your plugin on ChatGPT. One of the challenges of developing plugins with authentication is that you cannot easily test them. This is because ChatGPT does not allow localhost plugins to have any authentication strategies other than no authentication. One way around this is to use ngrok. First, you’ll need to install ngrok for your computer. Then, you’ll want to run ngrok and forward port 8000 on your computer to the ngrok server:
ngrok http 8000After running, you will see something that looks like this in your terminal:
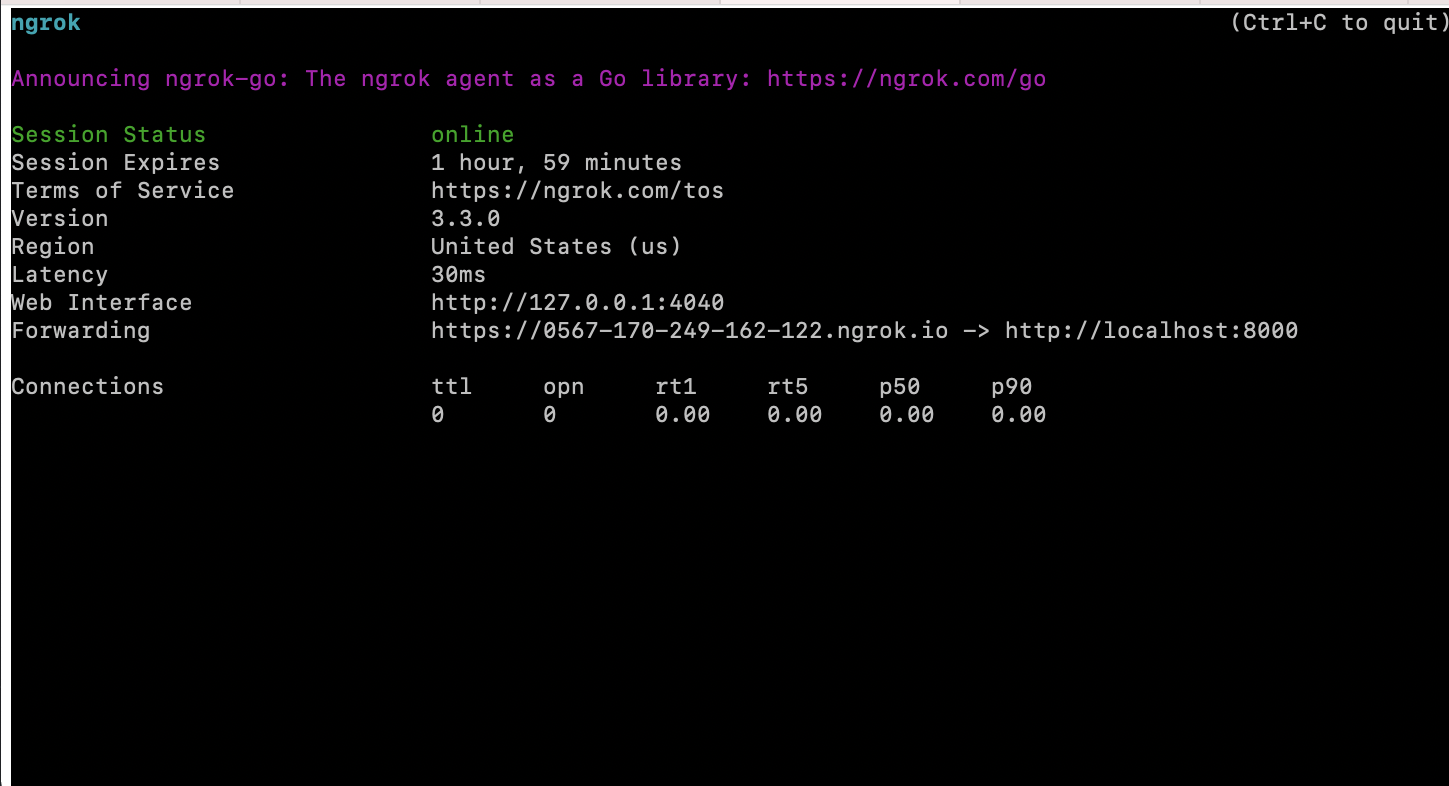
Pay particular attention to the Forwarding address. This is the address you should give to ChatGPT, as that’s the public address that ngrok will forward traffic from to your local server. Before continuuing, you need to update your plugin manifest to use this public web URL:
{
  "schema_version": "v1",
  "name_for_human": "Service Auth Plugin",
  "name_for_model": "pythonPlugin",
  "description_for_human": "ChatGPT Plugin with Service Auth",
  "description_for_model": "plugin which says hello with service auth.",
  "auth": {
    "type": "service_http",
    "authorization_type": "bearer"
  },
  "api": {
    "type": "openapi",
    "url": "https://0567-170-249-162-122.ngrok.io/openapi.json",
    "is_user_authenticated": false
  },
  "logo_url": "https://0567-170-249-162-122.ngrok.io/logo.png",
  "contact_email": "support@example.com",
  "legal_info_url": "http://www.example.com/legal"
}
Make sure your restart your server after updating your plugin manifest:
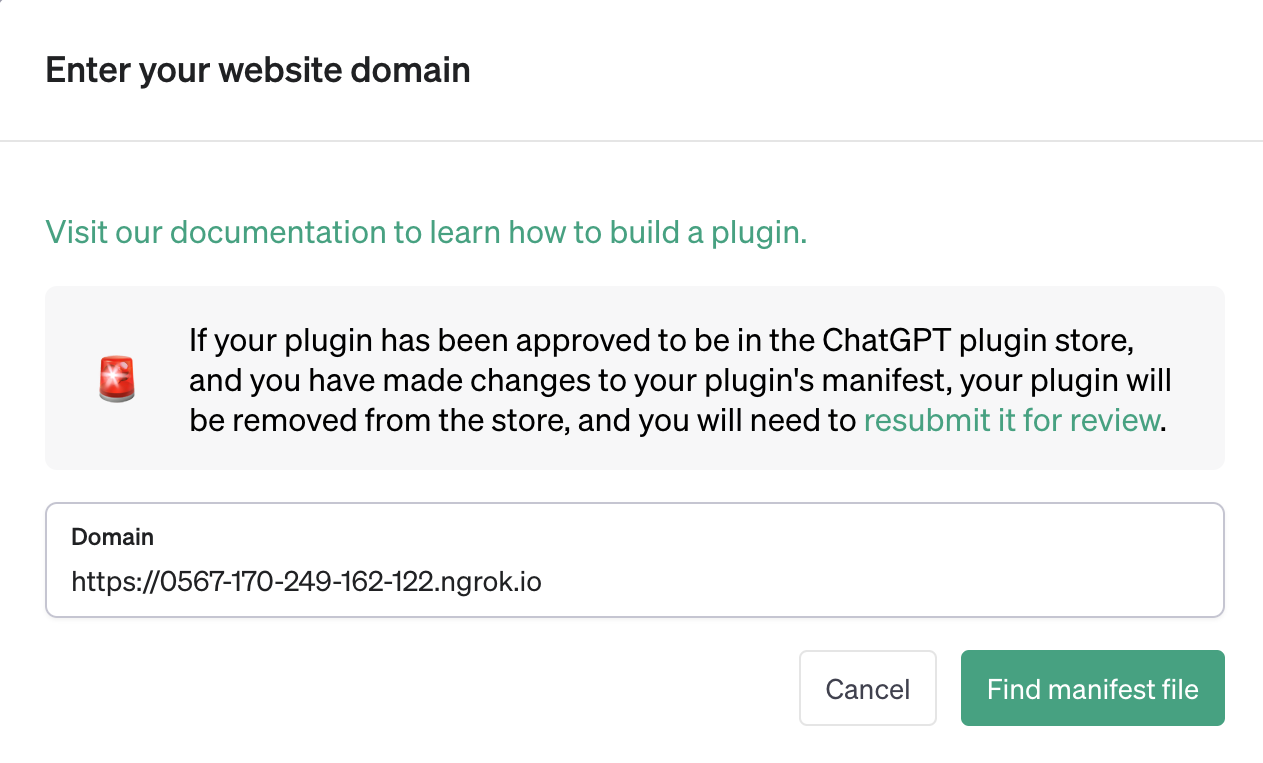
uvicorn chatgpt_service_auth_plugin.main:appNow, navigate to ChatGPT and select the plugin model. Then, click on “Develop your own” and provide your ngrok URL:
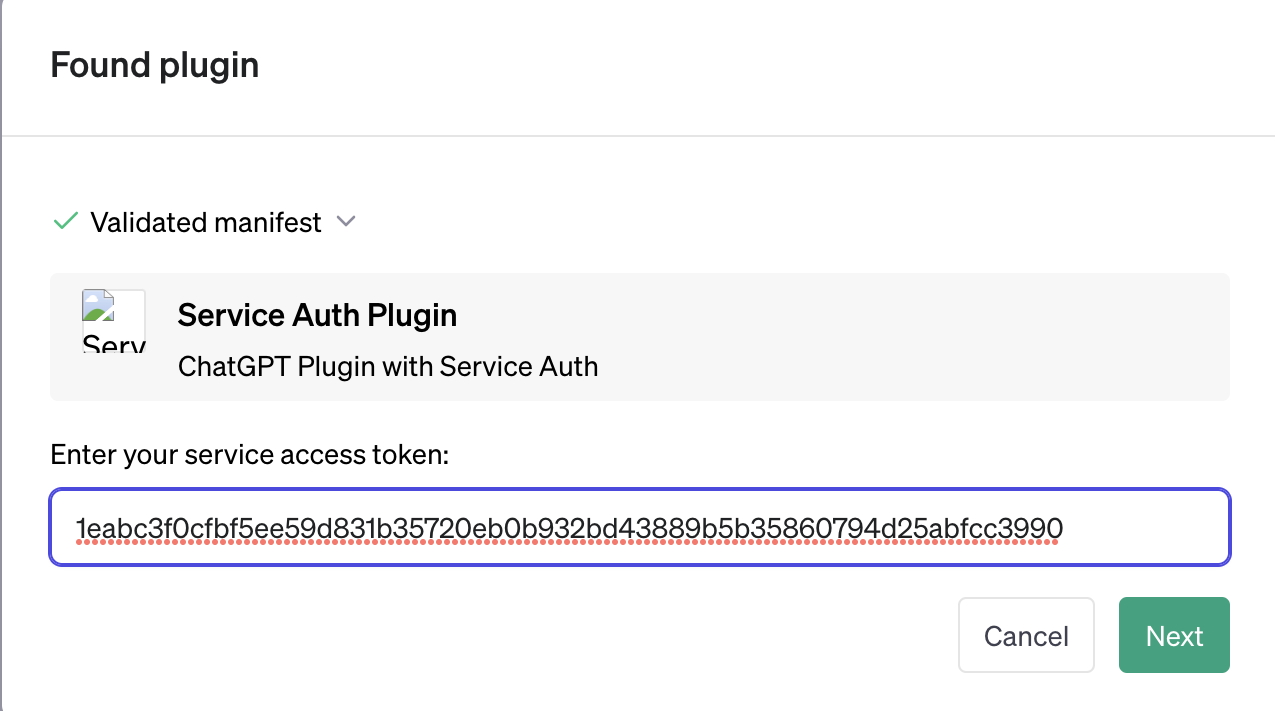
Next, you will be prompted to share your client secret. Pass your generated secret into the prompt:
You will then be provided with a verification token:
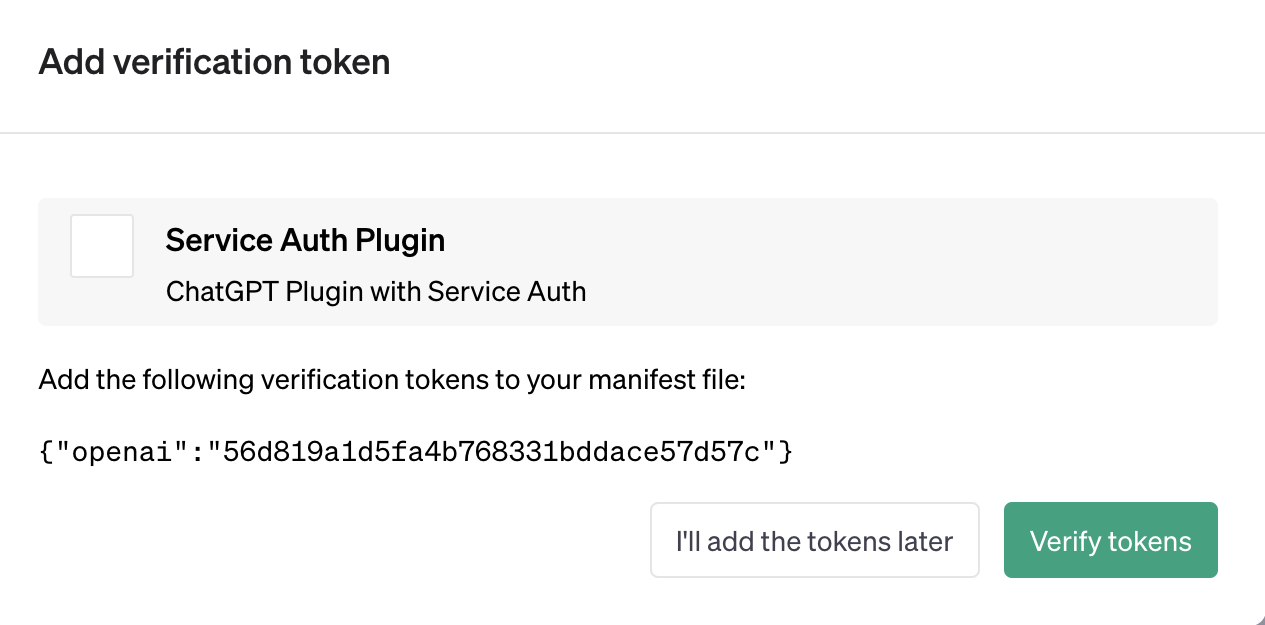
You should add this verification token to your plugin manifest:
{
  "schema_version": "v1",
  "name_for_human": "Service Auth Plugin",
  "name_for_model": "pythonPlugin",
  "description_for_human": "ChatGPT Plugin with Service Auth",
  "description_for_model": "plugin which says hello with service auth.",
  "auth": {
    "type": "service_http",
    "authorization_type": "bearer",
    "verification_tokens": {
      "openai": "56d819a1d5fa4b768331bddace57d57c"
    }
  },
  "api": {
    "type": "openapi",
    "url": "https://0567-170-249-162-122.ngrok.io/openapi.json",
    "is_user_authenticated": false
  },
  "logo_url": "https://0567-170-249-162-122.ngrok.io/logo.png",
  "contact_email": "support@example.com",
  "legal_info_url": "http://www.example.com/legal"
}
And restart your server. Then, click on “Verify Tokens”. If you did everything right, you should see the following screen:
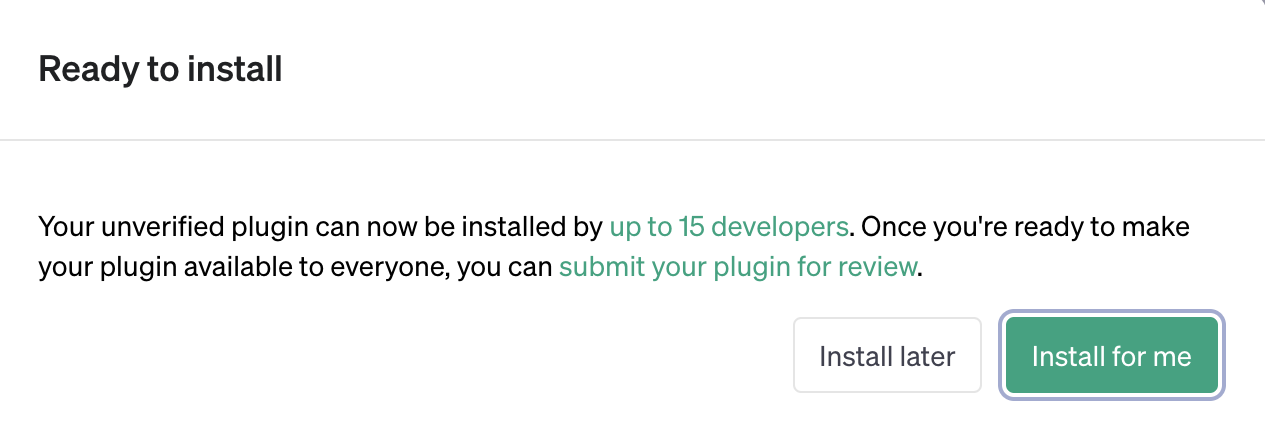
Now you can try asking ChatGPT to use your plugin! Note that users will not have to go through the same flow when installing your plugin. When you deploy your plugin, you will need to redo this process as well. A final consideration is secret rotation. At the moment there doesn’t seem to be a way to rotate client secrets without resubmitting your plugin. Best practice is to periodically rotate secrets.
Conclusion
In this post you learned how to implement service level authentication using with Python and FastAPI. Service level authentication provides a simple way to verify requests hitting your plugin API come from ChatGPT. Service level authentication is one of a few steps you should take for securing your plugin APIs. If you have questions or need help, feel free to reach out!
Enjoyed this post?
Subscribe for more!
Get updates on new content, exclusive offers, and exclusive materials by subscribing to our newsletter.